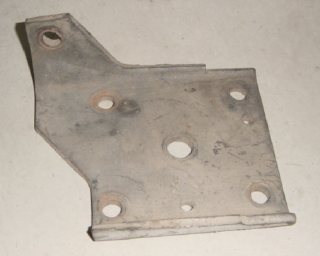
Below is a home made emergency brake bracket
A Guldstrand caliper bracket for racing use- left.
All are mounted to the stock drum brake housing flange.
This gives the same results as having a one piece JL8 rear brake setup, but does not require the factory drum brake flange be cut off replaced by a new JL8 pattern housing flange to accept the Corvette parts. This is a 11 3/4" dia X 1 1/4" rotor. It has a hat section on the hub that allows it so just slip over the drum brake axle flange. Longer wheel studs must be used, as the rotor hub is thicker than a stock drum.
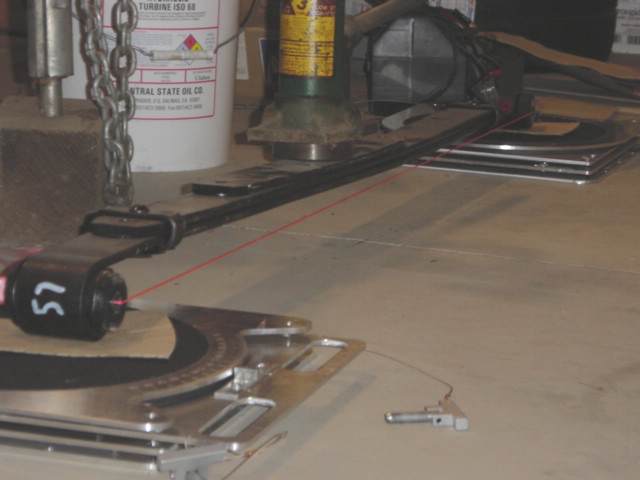
This is the right rear brake rotor, photo is taken from under the gas tank area looking forward. You can see the emergency brake pull lever just above the large nut. The large nut is holding the brake shoe anchor pin.

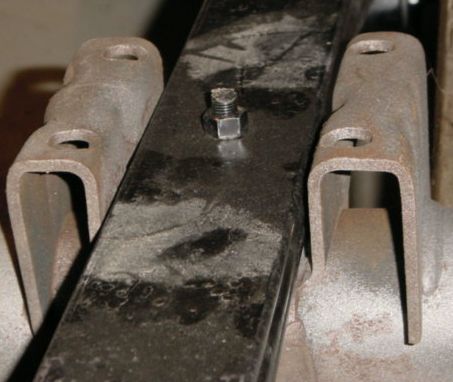
This is looking at the left rear axle. You can see the caliper mounting bracket sticking up, the caliper is un bolted from it. There is a star adjuster for the brakes that requires an access hole be drilled into the axle flange.
These brackets are on upside down compared to a JL8 Camaro. I did it this way to make the cable access easier and avoid hitting the Guldstrand caliper brackets.


Above is the second gen rear sway bar I adapted to fit my 67 Camaro. the second gen bar is wider than a first gen spacing, so I welded a piece of two inch wide channel to the spring plate and put wheel studs in from the back side to bolt the bracket to. Normally the bracket would be bolted to the inside U bolts.
NOTE: the modified shock bracket on the front side, my 67 was a mono leaf car and I had to move the shock mounts for wheel clearance reasons.
BELOW multi leaf plate
There may be a valving difference in shocks but NOT LENGTH. I've measured both multi and single leaf shocks, and the lengths are 19 3/4" extended, 12 1/4" compressed, measured from lower eye to top mount center.
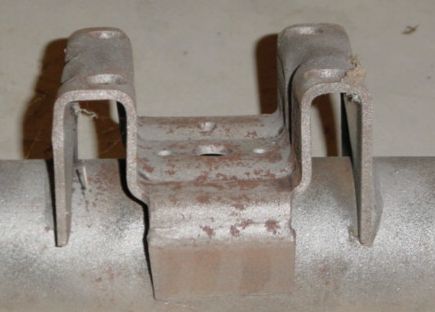
On a multi leaf setup, the spring perch welded to the axle has a deeper saddle ( see dimentions below) and the mulit leaf lower spring plate sits lower than on a single leaf car.
The lower "shock plate" on a multi leaf has a single shear shock mount on it and it's located higher than the single leaf shock mount to compensate for the thicker multi leaf spring stack.
The single leaf spring plate itself sits closer to the rear axle due to thinner spring perch and spring. It locates the lower shock mount much lower. It has a "double shear" mount with metal on both sides of the shock eye.
This single leaf spring plate is thinner than the multi leaf plate, and should be reinforced by welding reinforcement strips left to right across the plate front and rear. If this is not done, it may bend due to being held away from bottoming on the spring perch sides by the thicker leaf spring.
I converted my single leaf plates to a multi leaf single shear higher mount by cutting off the shock mount "legs" and welding a peice of bar stock across the front of the plate with a shock hole in it.
In case you didn't know, 67 shocks were both in front of the rear axle, 68 and 69 shocks were "staggered" - the left shock was relocated to the rear of the axle to dampen wheel hop. GM put mono leaf springs on all 67 Camaros and added a traction link on the right hand side of high performance models to reduce wheel hop complaints. 68 and 69 Camaros with high perf engines recieved multi leaf springs, with mono leaf still used on low perf applications where the 10 bolt rear ends were used. Early 67's did not come with the traction link at all.
Most people know this, but first gen Camaro owners are getting younger and younger!
If you use shock extenders or raise the rear, check your brake hose. The shock limits rear axle droop and if you extend the shocks the rear axle can drop down low enough to damage the rear brake hose which is very short.

Here is a NOS pair of Koni shocks for a Camaro rear. These are for use with Multi leaf springs because they have stud type lower mounting for use with the lower shock plate on the right. The plate shock hole is 1 3/4" lower than the spring.

Multi leaf shock lower end, a single leaf shock has no stud, just an open eye for a through bolt.
This lower spring plate is a 68 left rear for single leaf. It is a "double shear" type which means there is metal bracket on both sides of the shock eye. It extends down 3" below the spring plate
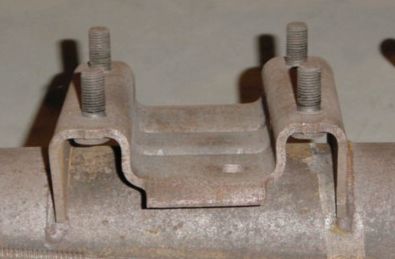
This is the multi leaf perch with a brace added from axle tube to front and rear edge of bracket. This is a very important strengthening addition to any Camaro that is driven hard or has traction bars. The factory welds are very weak in that they can tear apart just like a zipper unzipping .Note the center locator hole for the multi leaf spring.
Here is the three leaf Hotchkis spring laying in the multi leaf mount. You will need about a 3/4" or thicker spacer to allow the lower plate to properly clamp the spring. If the factory rubber pads are used less spacer will be needed.
The Hotchkis spring is 1 1/16" thick, the stock multi leaf spring is aprox 1 5/16" to 1 3/8" thick.
1" Deep
2 9/16" wide
9/16 thick
2 1/4" wide
1 13/16" deep
2 3/4" wide
1 5/16" thick
2 1/2" wide center bolt sticks up 5/16 to 3/8" from top of spring.
1 1/16" thick (in center)
2.5" width center bolt sticks up 5/16" from top of spring.
The hole in the top of the multi leaf perch is around 5/8" dia, and goes through the perch which is about a quarter inch thick. The spring center bolt on the hotchkis spring is 5/16" tall, so if you leave the pads out, you would need to use a 1 1/16" thick spacer plate on top of the spring, or grind a sixteenth off the top of the center bolt.
You would still need to either use the rubber pads, or use a 3/4" spacer to allow the spring to be clamped well.
The pads won't fit because the single leaf perch is narrower. I guess you could trim the edges of the pads to make them fit.
You can drill at least a half inch dia hole in the spring perch to accept the center bolt head, grind the head to 1/4" height, or use a sixteenth inch thick spacer. Use U bolts, not the studs that come from the factory.
Plan B would be to make a spacer plate 5/16" thick and put it on top of the spring to accept the center bolt head. If you weld the plate to the perch, it will help keep things from sliding around back there.
I didn't measure any of the rubber pads.
If someone has the mono leaf lower spring plates, they are much thinner and weaker than the 68/69 plates. I'd
get them reinforced before doing this or they will bend and crack. Mine did.
The mono leaf plates also mount the shock lower than the multi leaf plates because the multi leaf perches sit lower.
If you use the single leaf plates on a multi leaf spring, you have to not only reinforce the plates, but raise the shock
mounts up.

My first step was to determine the actual weight on the spring, or "spring load".
I looked up an old rear weight I had for my 67 with full tank and spare tire-1600 lbs.
I subtracted the weight of the 12 bolt rear end with brakes-185 lbs, plus half the springs weight-35 lbs= 220.
I didn't figure half the shocks weight, because they don't weigh much. I should have taken half the driveshaft weight but flat forgot.
I got 1380 lbs rear weight, the load on one rear spring is 690 lbs. I used 700 lbs as my "test weight".
Now, to test a variable rate leaf spring, you are supposed to measure the rate one inch above and below the normal ride height. Then average the two rates to come up with the spring rate at normal ride height. I decided to use a half inch above and below and measure the difference between them, which would give an automatic average spring rate in lbs per inch. I got 160 lbs rate at normal ride height with 700 lbs load and an arch of 3/4" measured from a line between the spring eyes to the top* of the spring pack, and measured at the center bolt location.
What was very interesting was the next inch of droop was 80 lbs per inch, the next TWO inches were 80 lbs per inch TOO! I think the main thing that is happening with this spring is the two main leaf's are providing the 80 lbs, the short leaf is not touching until the last inch, then adding quite a bit of rate, like double the rate.
The front of this spring is VERY stiff and the main deflection is the rear "half". At full deflection, the center bolt area was about 3/4" higher than the front of the spring about six inches behind the front eye.
I was suprised at the low rate of this spring, While it should ride nice, I thnk it may be a little soft for what I want to do with it. I will compare it to the Guldstrand spring I have in my car now, I was very happy with the Guldstrand spring rate, whatever it is?
I have a new pair of Hotchkis rear leaf springs, new U bolts, and new lower plates (ford type)
I will look into moving the springs in a little like Kyle Tucker did, only a bit less than he did. I may get a half inch in the front and maybe 1" in the rear. . This will require new spring pads and I plan on welding in new housing ends with sealed bearings too.
Next will come a minitub job for the rear wheelwells.
I'll add more info when I do more on the rear suspension. I'm still working on the front right now.